Hey guys! Julian here with Production Music Live and today I'm going to talk about mastering in Ableton with only Ableton plugins.
I just want to start off by saying that my process of mastering is really just a final loudness push and maybe like a tiny bit of gentle rebalancing and just gentle eq moves. It's like the final five percent last push and polish of the track.
Before I master the track I already have mixed it to sound exactly the way I want it to sound once it's mastered - obviously just not as loud. So if you are working on a track and you want to master it because you think the track doesn't sound good and you think that mastering is going to make it sound good you should stay away from that process of thought.
Just make sure that you're working on the mix and getting the mix sounding as good as possible and you should be referencing already in the mixing stage - not only in the mastering stage.
Another thing is that typically when i've seen mastering tutorials in the past people have a pre-master loaded into their DAW and they're kind of mastering a file as if they're doing it for a client and they're a mastering engineer - but typically people that are looking for mastering tutorials on youtube are not mastering engineers. They are bedroom producers who have access to the entire project - so anytime you find a problem in your mix, say for instance the track is too boomy and bassy, you shouldn't be sitting there on the master and trying to eq the bass. You should go back into the project, find your bass channel and turn it down or eq the bass.
Every problem should try to be solved as close to the root of the issue as possible.
Now let's go through my mastering chain!
1. Voxengo SPAN
SPAN (placed at the end of the chain), has great spectral analysis features and also allows me to measure the LUFS (loudness units) of my track.

2. Glue Compressor
Instead of limiting, I’m using a glue compressor. I’m pushing the loudness of the track with the makeup gain, and I’m soft clipping the signal with the “Soft” setting.

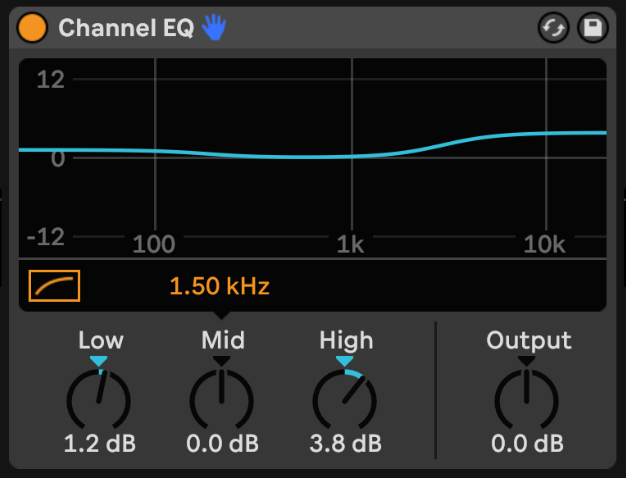
3. Channel EQ
When I'm EQing on the master, I generally prefer to use the Channel EQ. It’s like the closest thing you'll find to an analog EQ.
It's always better to use these semi-parametric EQs or analog modelled EQs if you can. That's because they generally have predefined points that generally, historically sound really good. That's why they're so desirable, and these EQs cost like thousands in their analog form, and the curves are generally really gentle, so it's difficult to make huge mistakes with these analog EQs.
If you're sitting there with an EQ Eight and making these like huge, crazy dips and notches and these crazy bell curves, quite often you're creating resonances, and for every problem that you solve, you're adding three three new problems.
4. Saturator
The next thing I've got is the saturator. As you can see, I'm doing quite a lot of clipping and saturation because it just typically sounds a lot better than compression and limiting.
Here I've got the Saturator set up only doing a little bit of a loudness push. I use the Analog Clip mode and i'm balancing the input and the output, so that the saturator is not pushing the signal too much.
It's going to just be adding more harmonics to the track - so that's going to make it feel a little bit louder but the actual signal is not getting that much louder.

5. Limiter
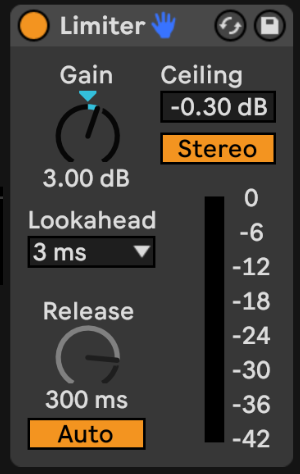
This limiter is the final element in the chain. I’m just turning that on and doing some very, very subtle limiting.
The stock Ableton limiter sounds pretty horrible - it's usually on “auto release” and I don't like putting things on auto because I don't really know what they're doing. I set the release pretty fast. What release does, is it sets the time how long it takes for the limiter to back off on the gain once the signal goes below the threshold.
If it's set to 18 ms, it's going to reset really quickly. With these quicker settings you often find that they distort quicker but they also get louder and the more gentle settings are, generally, the more forgiving they are - but they can also sound quite “pumpy” sometimes, so you just got to kind of play with them and see what sounds good.
There's also a ceiling here of -0.3 dB, and that's just because you typically get something called intersample peaks - these kinds of peaks that the limiter doesn't catch properly and they go can jump over 0db and distort sometimes. That's again another issue that's kind of up for debate. I’ve seen some mastering engineers that don't care about them, because they say that these intersample peaks are so rare, and they are almost inaudible. It’s up to you whether or not you want to do that.
I hope you took something away from this article. My process is probably a lot simpler than most tutorials out there, but I think this is the reality of it for a lot of professional producers out there. They're also doing really simple gentle moves on their masters and not doing all this crazy mid-side eq and multi-band compression.
I just typically for all of these crazy moves that you do you're just creating more issues in other places where you're fixing one issue in one place.
Thanks for reading, I hope you enjoyed this and i'll catch you in the next tutorial!
- Julian
See Also:
11 Mixing Tips in Ableton Live - Mixing Problems Every Producer Will Face
How to Write Unique Chord Progressions with Voice Leading
How to Process Vocals: 3 Levels of Vocal Effects (Free Vocal Samples Included)
master tracks
like a professional

See the entire mastering process explained in detail every step of the way.
Learn basics to advanced mastering techniques to get your music ready for the club.
About this Course:
After having taken this class, you'll have seen a complete mastering process first hand in several different styles, executed with different tools: Waves plugins, Fab-Filter Plugins, Izotope Ozone Plugins and Ableton Live stock effects. We are starting with the basics and working through all the different important stages of the mastering process.
What You Get:
- Basics of Mastering, advanced techniques and a complete start-to-finish production course.
- 45+ Studio sessions with Francois
- 5h+ online video sessions with lifetime-access
- Bonus Video: Mastering Melodic Techno with Ableton stock effects
- Bonus Video: Mastering a Pop Track with Ableton stock effects
- Bonus Video: Mastering an EDM Track with Ableton stock effects
Click here to learn about this Mastering Course.
