One might say that there’s no mistakes when producing electronic music, as long as it sounds good. However, when giving feedback to fellow producers, I find myself noticing the same things I don’t like over and over. I thought I’d list these issues in an article, so that you guys make sure you’re not making these ”mistakes”. I’m also going to include techniques of dealing with these problems, which should greatly impact the sound of your tracks. Let’s get started!
1. Overproducing
I’d say that the most frequent mistakes producers make is producing without a strong core idea. It could be the catchy harmony or amazing drumming, outstanding sound design or just the awesome vibe of your track. I think you should go into making your track with a certain approach which is suitable for the genre you’re trying to make. Otherwise you’re going to end up stacking tracks and overproducing a weak idea.
The best tracks are often made of fewer elements than you think. In fact, very rarely are there more than 5 core elements playing at one time in a track. The most basic track structure is a kick, a snare, a percussion element, a bass and a lead sound. However, with the possibility of adding countless new tracks in your DAW, you might get tempted into doing too much.
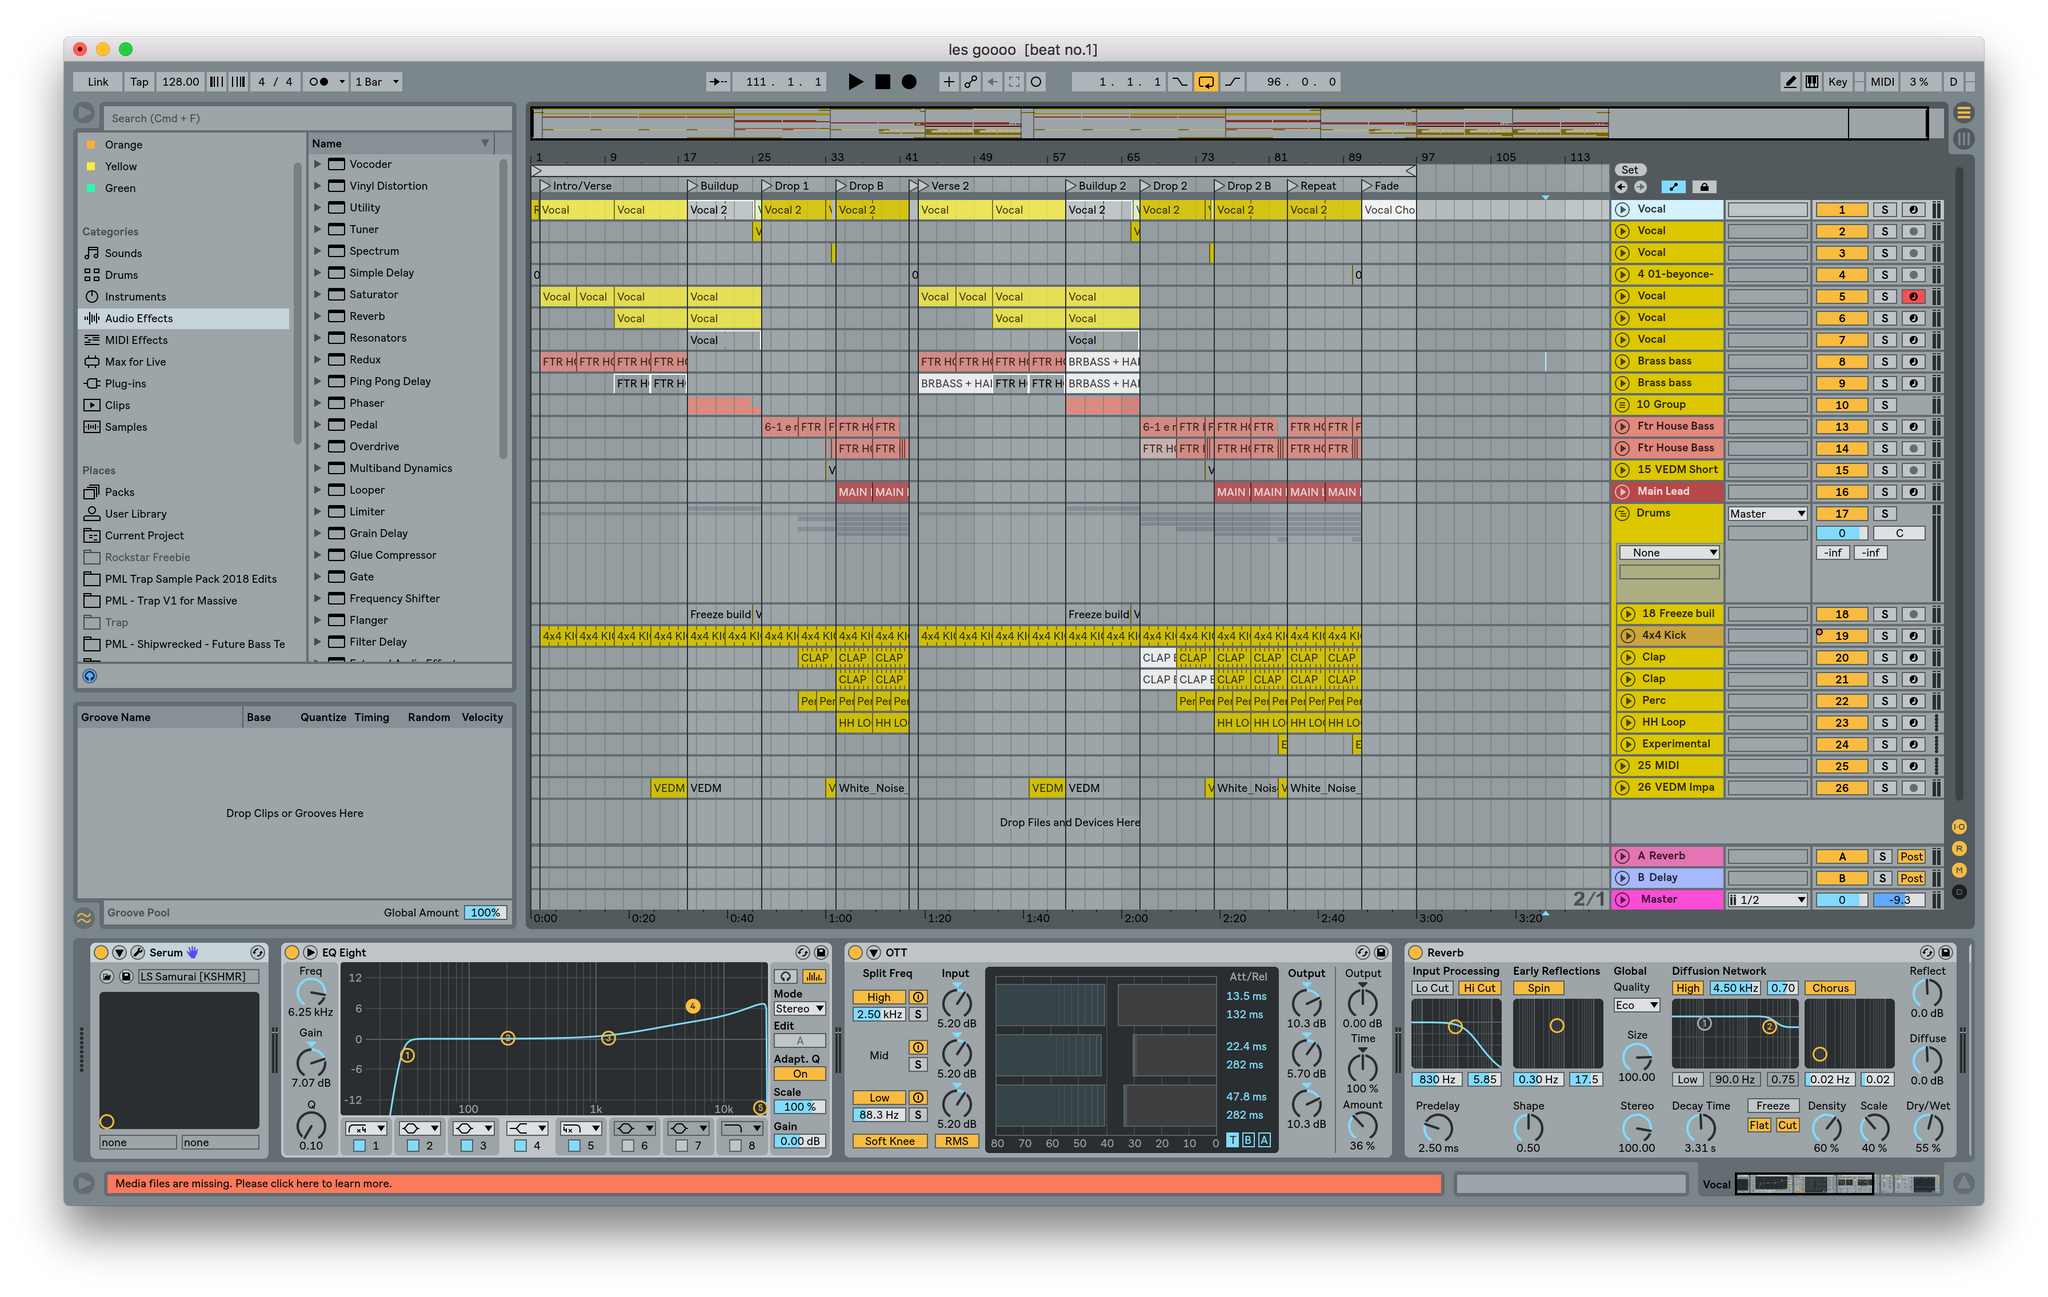
If you feel like you have too many tracks in your project, it might be because you're overproducing. The screenshot above is a typical EDM project file.
I find that the best approach is to learn to distinguish between the different elements of electronic music and to make your music with a constant focus to these key elements. This way even if you’re going to create many tracks, you’ll still be able to easily distinguish between the core of what’s going on. I’d rather listen to a few well produced elements than hear fifteen FX samples over a weak core of the track.
Check out another "10 mistakes" blog post!
2. Getting lost in advanced stages of production
Have you ever made something cool, gotten excited by it and tried to polish that idea, just to find out that you’ve been messing in a synthesizer for an hour? You may have made your idea sound a bit better, but you’re still far from a full track arrangement, and the initial excitement has evaporated leaving you frustrated with a half-baked idea.
Same goes for other aspects of production. You may get lost trying to layer samples, trying to compress the drums or adjusting the levels. To avoid this situation, keep your cool when producing and don’t get too excited by a good idea. When starting a track, focus on each element for just a while. I find that the best tracks are made as a result of a series of quick and good decisions. Try to also limit yourself to fast moves only. Focus on the track as a whole, don’t try to make each move super precise.
3. Getting stuck in a loop
We’ve all been there. You made a cool loop, but there’s way too few elements for a full track, and you have no idea what sections should the arrangement consist of. There’s two things you can do.
First, you should know your genre. This means you should know what sections a typical track in your genre consists of and what elements play in each of these - remember, there’s rarely more than 5 at one time. To make this easier, you could import a reference track into the arrangement, warp it and map out sections using time markers. In most genres, copying the sections order from another track is no sin at all. If you need help with warping, here’s a tutorial to help you.
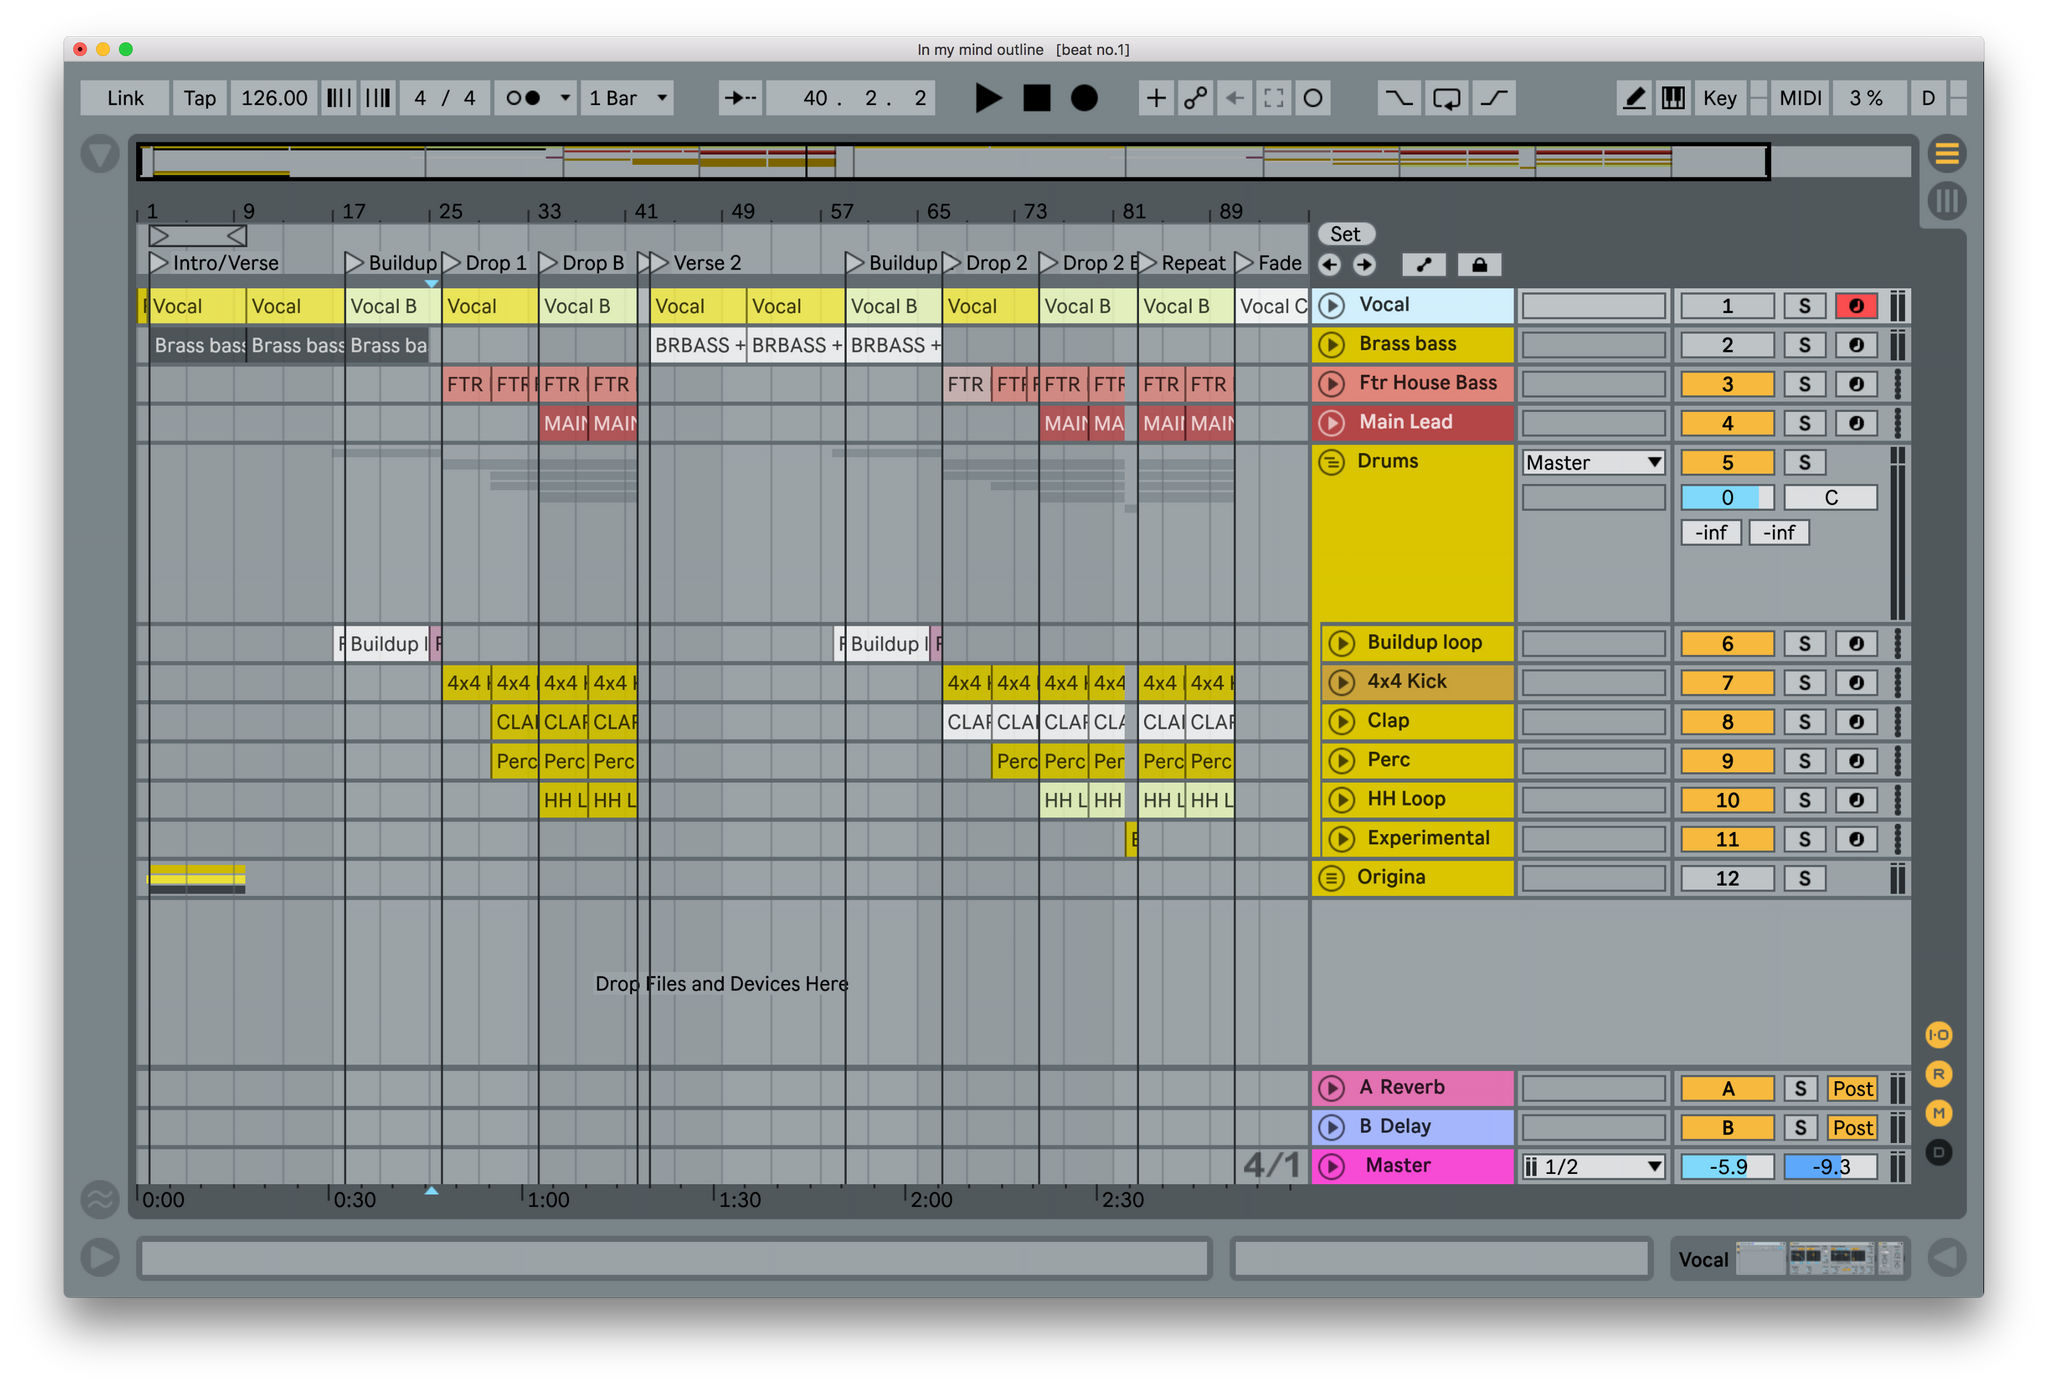
Here's what a bare-bones EDM arrangement looks like.
Now you need more elements to fill out your arrangement. You may or may not need to come up with a different chord progression, depending on the genre you’re making. If the reference track is not much of a rollercoaster, you may even do fine with making just slight variations of the initial loop elements and spreading them out across the arrangement. Modern genres however frequently feature new elements in each new section.
Check out the article: 5 Ways to Get Better Using Project Files
4. The BPM
This one is too simple to get wrong. It’s not easy though! When starting a track, you may start from a ”default” tempo, i.e. 128 BPM. As you produce, you should adjust the tempo, but I find that most times I forget about it. The ears adapt to the tempo quite quickly, even if it’s off. At the end of making a track, you should always check if a faster or slower tempo doesn’t make the track better. You may want to have a break from the track just to refresh the ears. Often times I find that my track’s too slow and I need to speed it up a bit.

5. The key
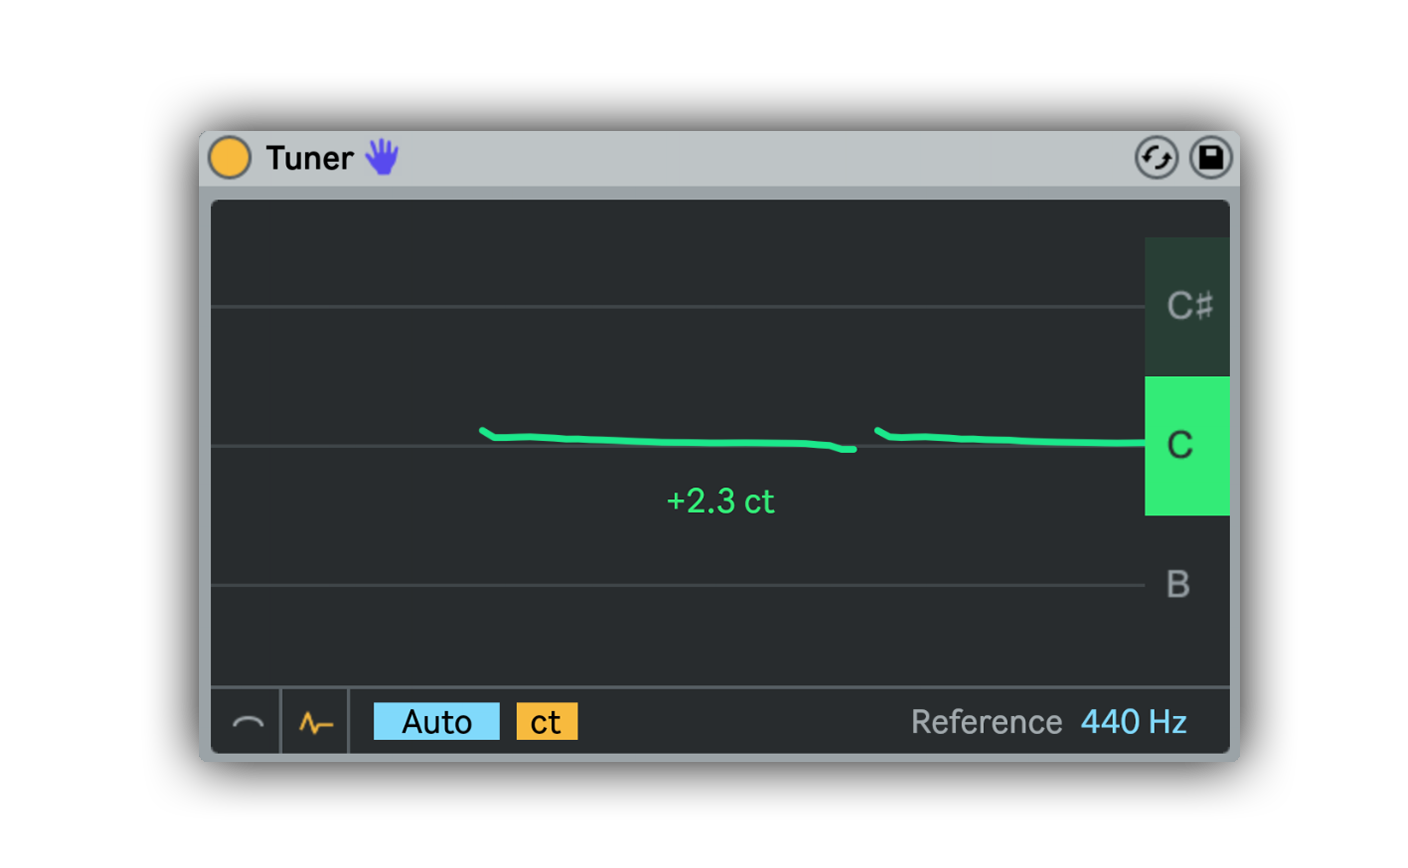
It’s not as easy as it seems to stick to one key. The more tonal samples and loops you use, the harder it becomes, as samples come in various scales. It’s easier if the tonal centre is included in the name of the sample, but that’s not always the case. To combat this problem, I frequently use the Tuner audio effect to figure out what note the samples are playing. It gets more tricky when the samples include multiple elements. In that case I either isolate frequencies with EQ before checking it with the Tuner, or I rely on the ears and try to match it to a key using a simple instrument.
It doesn’t always need to be done though. If some samples come from very distant keys, they might sound more interesting without transposing. It may take a long time to match the tonal centres of the samples correctly and the samples may sound completely different when pitched.
If you’re struggling with keeping to one key when writing progressions and melodies, check out this freebie with ready-to-use Ableton scales!
6. The harmony
Too little harmony and your track sounds boring, too much harmony and it’s too complex. It’s essential to know how much harmony is needed in your genre. Very often I come across tracks, which have a very complex arrangement, but there’s barely any harmonic elements. It may be very subtle and repetitive, but harmony is necessary to keep the listener engaged.
Check out article: 5 Ways to Write a Melody
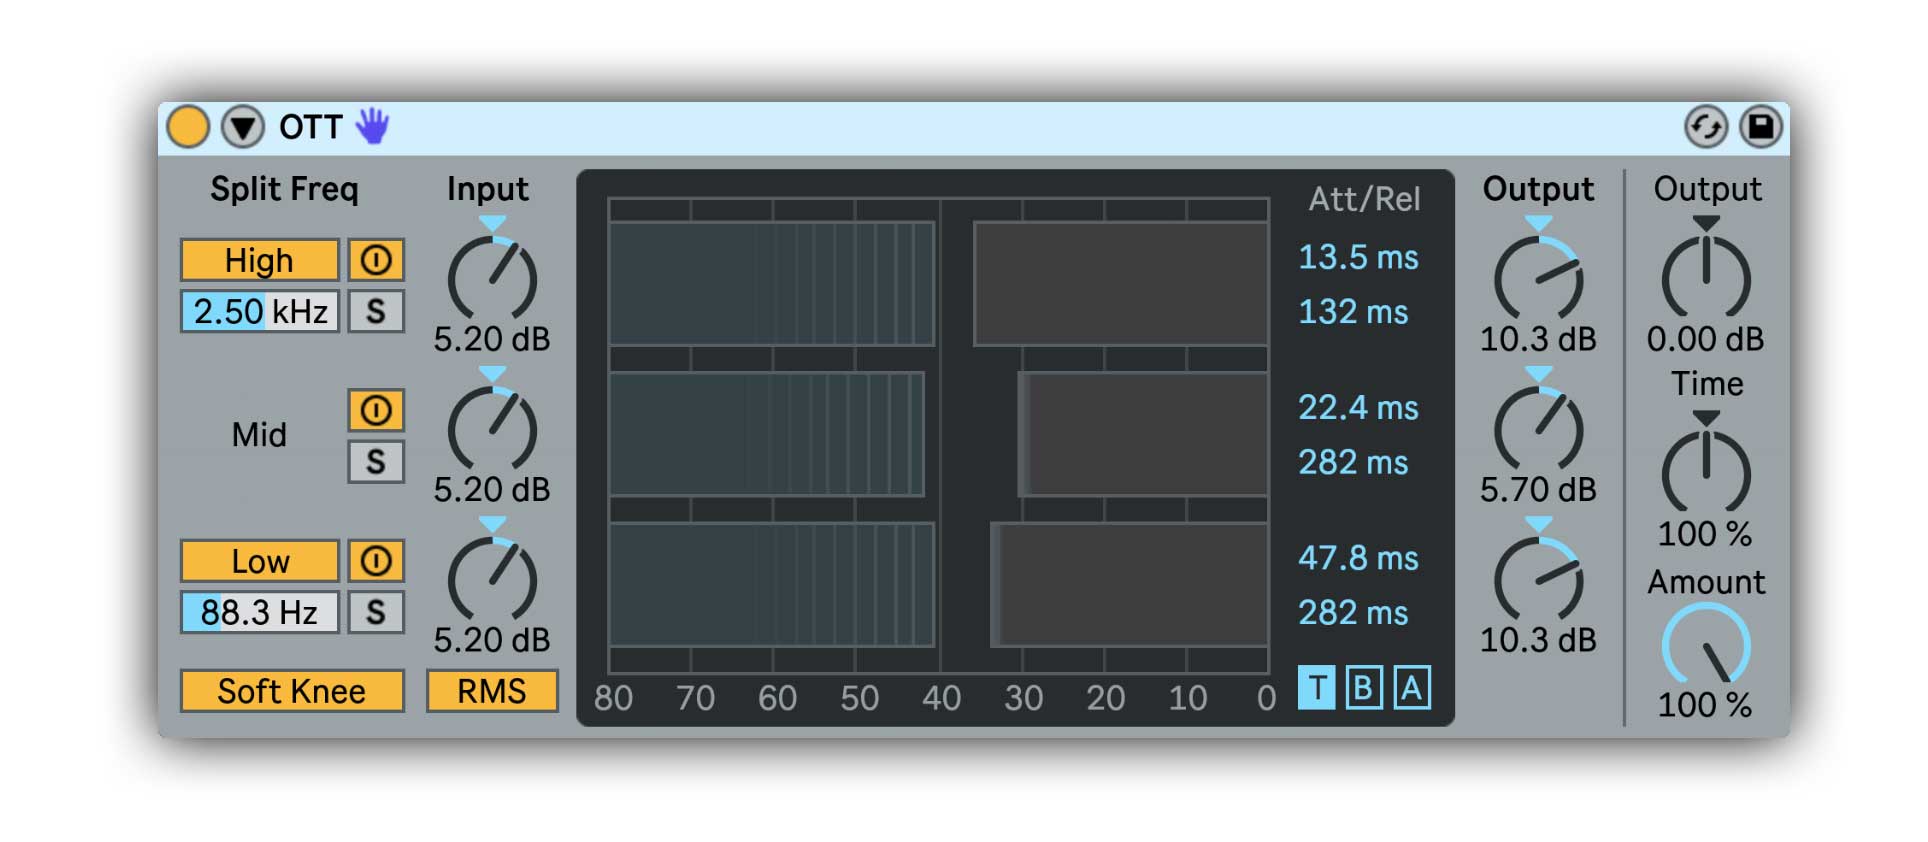
7. Excitement
Another thing I notice frequently is dull-sounding synths. This can easily be fixed using OTT, EQ (boosting the highs) or saturation. It happens especially when you make your own synths, presets often use some kind of excitement. A classic example of synths that need excitement are future bass supersaws. These monsters usually use upper harmonic synth layers and OTT. Brighter tracks also result in tracks being perceived as louder.
Check out article: 5 Pro Ableton Audio Effect Tips
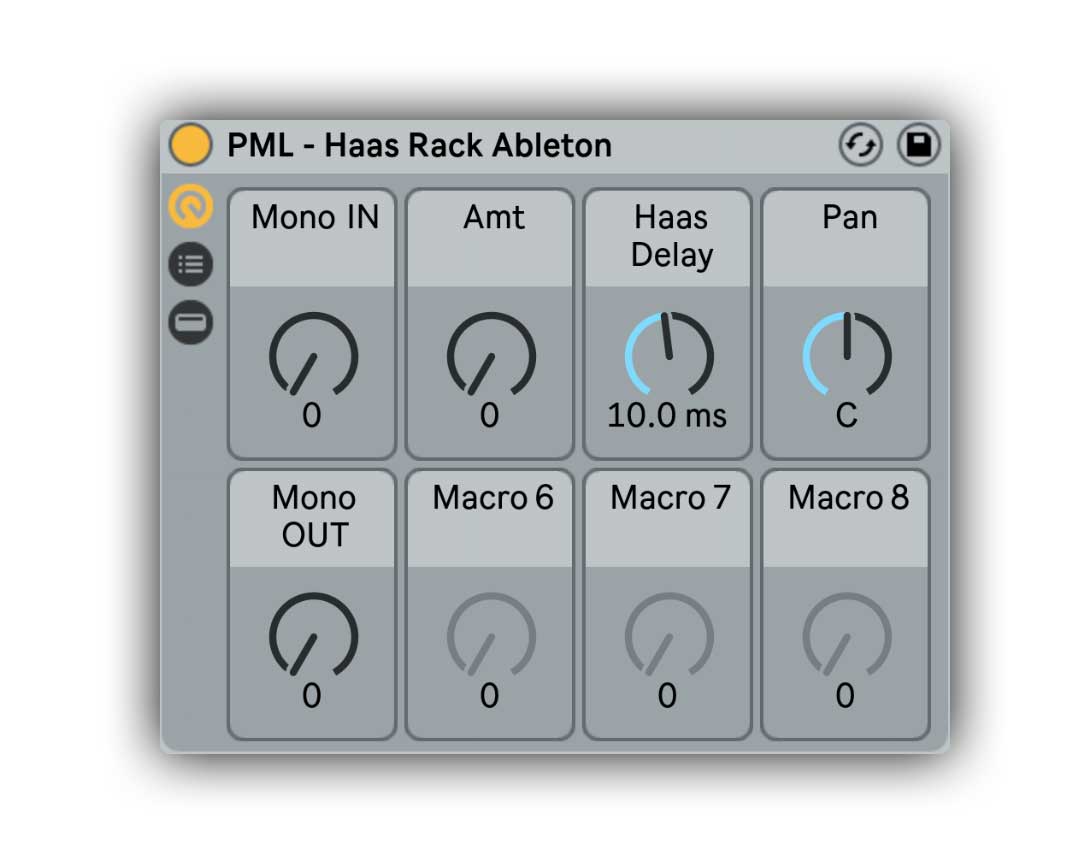
8. Stereo
Everybody knows what stereo is, but using it properly isn’t common knowledge. While panning is pretty obvious, stereo enhancement is a subject with a lot of myths floating around. Most producers know that bass should be kept mono, but even that is not a rule of thumb.
First of all, a stereo image is created when there’s difference between the left and right channels. It could be a difference in pitch (for example when using unison in a synth) or in time (for example when using delay or reverb). The lowest frequencies most times are kept mono, so that they can be played on mono subwoofers. Higher frequencies however may be wider without issues. Some instruments may be wider (pads, synths), while others may be kept in the center (kick, leads, vocals)
Making something mono is as easy as turning down the stereo knob in Utility. Widening is trickier, but the easiest technique is using the Haas effect - it’s in our freebies section.
9. Loudness and clipping
The loudness war’s been over for some time now, yet I still see producers limiting their tracks like crazy. These loud masters are simply turned down in volume by most streaming services. As a result these tracks don’t sound any louder than other tracks and are less dynamic because of the limiter. When mastering, keep the loudness in moderation.
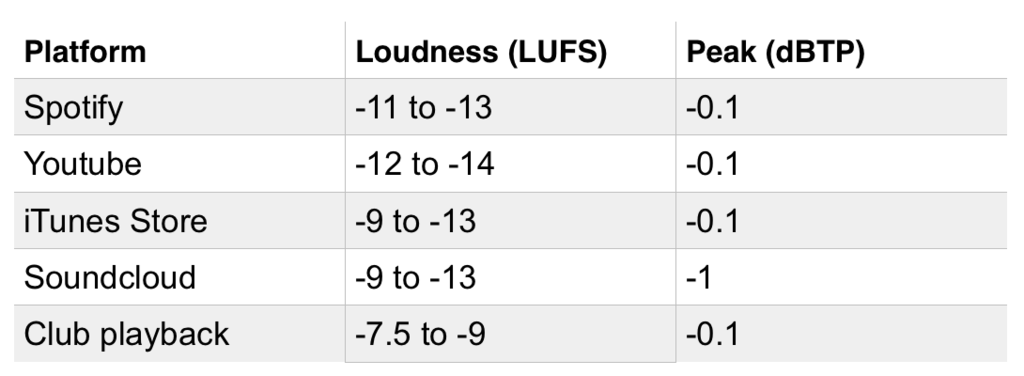
Here's a useful chart on LUFS (loudness) levels for streaming platforms. More in the article here.
A weird thing I noticed is that plenty of producers believe that internal clipping between Live’s native devices. I’ve tested it and can say with certainity that that is not true. You may get clipping on the master track or between plugins which don’t handle loud signals well. Most times, tracks’ volume may go red with no consequences at all.
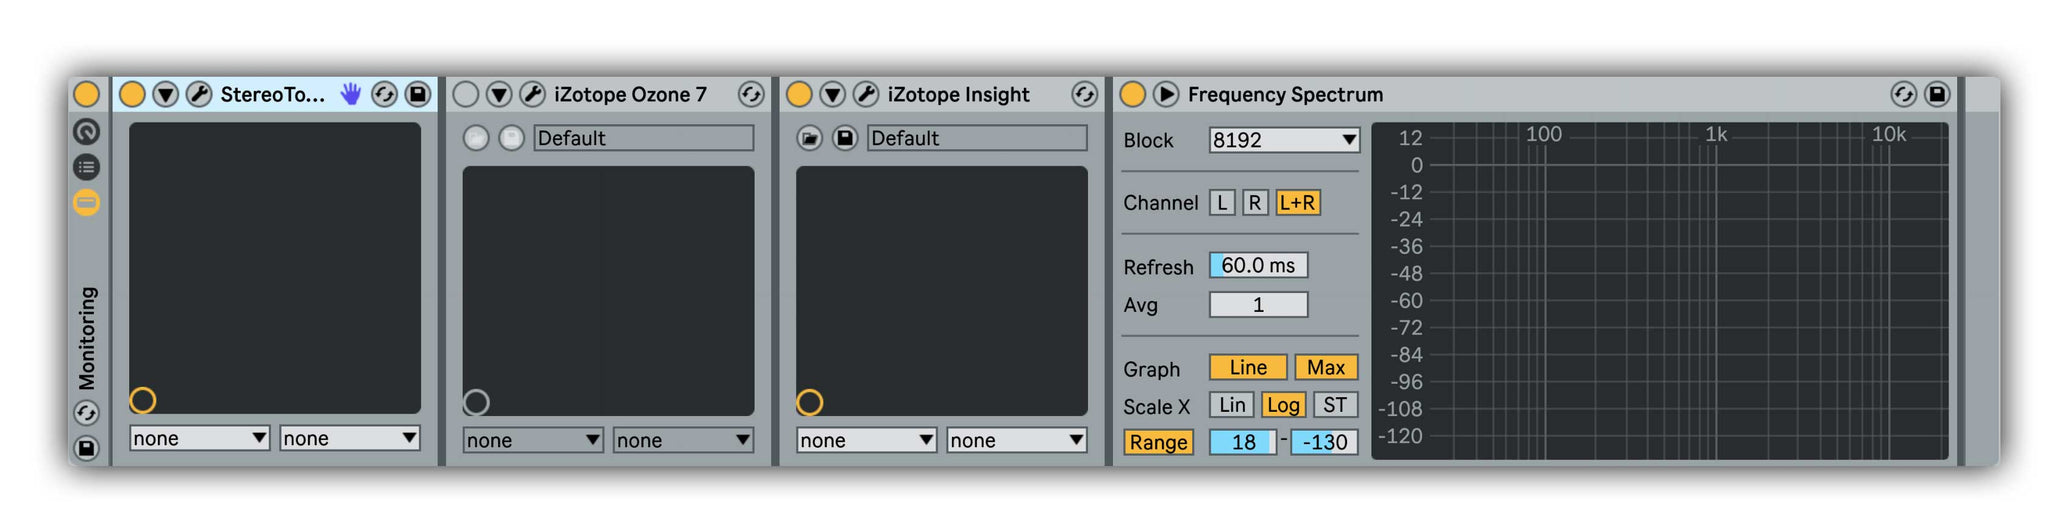
10. Not using monitoring tools
When mastering you should rely mostly on your ears, but monitoring tools can help you immensely. Loudness meters allow you to measure not only the peak levels of the master, but also give you an overall loudness index. Stereo imaging plugins allow you to visually see the stereo image when comparing it to the reference tracks. You may also find it helpful to preview your track in the MP3 format - Izotope Ozone allows you to do that using the ”codec” function.
Thanks for checking out this article!
 k-pizza
I’m a music maker who likes to share his experiences with other producers. I regularly show up with tutorials, articles & project files at PML.
Skype lessons with me: http://bit.ly/pml_s_one2one
|