Do you want to know how to make a beat with Ableton Live? You can go about several ways, using a drum rack, MIDI, or audio channel – or a combination of all. But how do you make a beat, and what are the benefits of doing it in different ways?
In this article, we will show you exactly how to make a beat in Ableton Live – complete with professional tips on the things you need to keep in mind.
Step #1: Drum Rack, MIDI, or Audio?

There are three main ways of making drum beats in Ableton Live, and they are with drum racks, MIDI, and Audio. While most can load and put together drum sounds, each has its specific benefits that make them more suited for different situations.
Let’s go through the three methods in detail.
Drum Rack
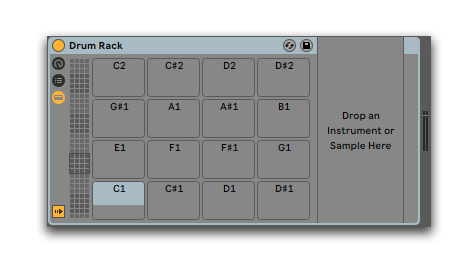
The Drum Rack is an instrument located under the left-hand “Instruments” tab in Ableton Live. Upon double-click, it will reveal a rack with empty slots and notes, going all the way from D#-2 up to the E8 key.
Drum Rack allows you to load several drum samples simultaneously and play them from one channel and one rack. All the sounds you load into a Drum Rack use MIDI and the Ableton Live "Simpler" sampler.
The Drum Rack can store and play all of your one-hit drum samples, including:
- Kick
- Snare
- Clap
- Hi-hat
- Percussion
Just load your samples into your rack and play them on your keyboard. All your drum sounds' configuration capabilities allow you to control the attack, decay, sustain, and release to shape the sound as you wish. You can also use panning, transposition, filtering, and LFO's, or add more effects to each specific sound.
When To Use Drum Racks
Drum racks are a great way of keeping all of your one-hit drum sounds in one channel. This means you can have an entire percussion group or set of drums in one convenient location. And if you want, you can use effects on the Drum Rack channel, which will affect all of your drum sounds.
Use the Drum Rack when you want an easy overview of your drums or when you, for any reason, want to group your drum sounds.
MIDI

Dragging a drum sample into the bottom part of Ableton Live loads your sample into the “Simpler” sampler, just like in the Drum Rack. The only difference is that you only have one sound in your channel, rather than a rack or group.
The Simpler allows you to shape your sound as you wish, controlling its attack, decay, sustain and release, and more. You also get the ability to slice the sound and divide it into different sections, which you then can play on multiple notes in the piano roll.
One major difference that MIDI has over Audio is the ability to draw notes in the piano roll, something which Audio can’t do.
When To Use MIDI
Using a single MIDI track is desirable when working with a specific drum sound, like a kick drum. Drawing your notes in the piano roll is often faster and a bit more straightforward than arranging audio clips.
Plus, it allows you to play the notes on your MIDI keyboard, which can be beneficial when you’re recording your groove.
Slicing is also another advantage, which is done quick and painless in the Simpler. It’s a great way to find one-shots in longer loops or samples.
Audio

Audio gives you a waveform in the arrangement view plus many interesting warping capabilities. If you work with loops, you can warp your sound to fit your song tempo, transpose it, and use a wide variety of warping algorithms giving you different interesting results.
It’s more complex than using straight MIDI but gives you a lot more control over shaping your drum sounds. You can also put together loops quickly by consolidating your blocks of audio.
When To Use Audio
The best time to use audio is when you want full control over your waveform and want to visualize what’s happening.
When you bounce a drum sample to audio, you see its exact audio waveform, which you can manipulate any way you wish.
It also works beautifully with loops and longer recorded samples, giving you the ability to tempo match and warp it with ease.
Start Making Beats With The Drum Rack

For your first beat in Ableton Live, we recommend loading a Drum Rack into an empty MIDI channel and then drag your chosen drum sounds into it. It’s a very easy way to put together a drum set, which you later quickly form into a beat in the piano roll.
Step #2: Choose Your Drum Sounds

Next up is choosing your drum sounds for your beat. And even though virtually any sound can characterize a beat, it’s best to start with the basics.
A standard drum set consists of a kick drum, snare, toms, hi-hat, rides, and cymbals. And today’s popular electronic music often uses the same sounds, with slight variation.
Take house music, for example, where you often use the following drum sounds:
- Kick drum
- Snare
- Clap
- Hi-hat
- Random percussion
- Cymbals or shakers
To make a house beat, we need to load our drum rack with samples of the same type of drums. You use a kick, snare, clap, hi-hat, random percussion, and a cymbal.
Don’t have any drum sounds yet? Check out our latest professional drum sample pack Deep Premium Vol.4 - Drum Sample Pack
How To Load Drum Sounds Into Your Drum Rack

Find the folder on your computer where you keep your drum sounds. Drag them into one of the boxes in the Drum Rack and repeat for all your drum sounds.
To configure the individual sounds, or adjust volume and panning, click one of the boxes to access the individual drum samples “Simpler.”
You then draw the notes in the piano roll of the Ableton Live arrangement view, like any other MIDI synth or instrument.
Step #3: Make Your Beat

Now it’s finally time to make your beat. Because there are as many beats you can make as there are music songs globally, there isn’t just “one way” of creating a beat. How you go about it is up to you, and your decisions will change depending on what genre you’re creating.
If you’re making electronic music that mimics the beats of standard drum sets, you want to replicate the type of grooves you’d play on a drum set.
However, the cool thing is the freedom of working in a DAW; there are no limitations. You can use real-life drum sounds and make them sound completely out-of-worldly and impossible for a human to play.
But to start, let’s make a simple, classical house beat.
Example: How To Make Your First House Beat in Ableton Live 10

Go to the left pane, click "Instruments," and load a Drum Rack into an empty MIDI channel, then add these samples to your rack:
Kick
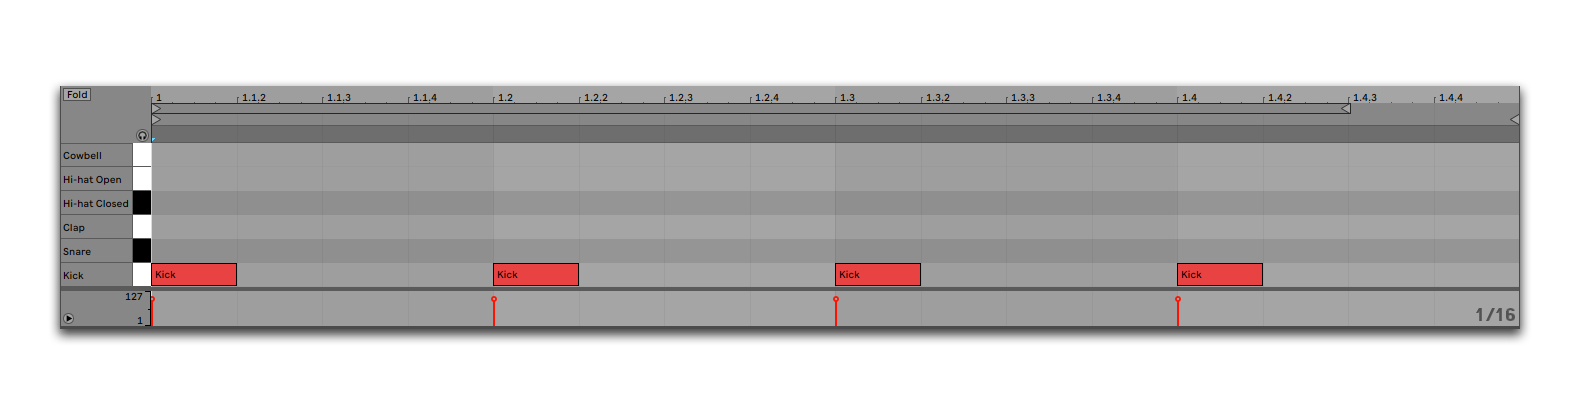
Draw a kick every 1/4 bar.
Snare

Add a snare on your second and fourth kick drum hit.
Clap
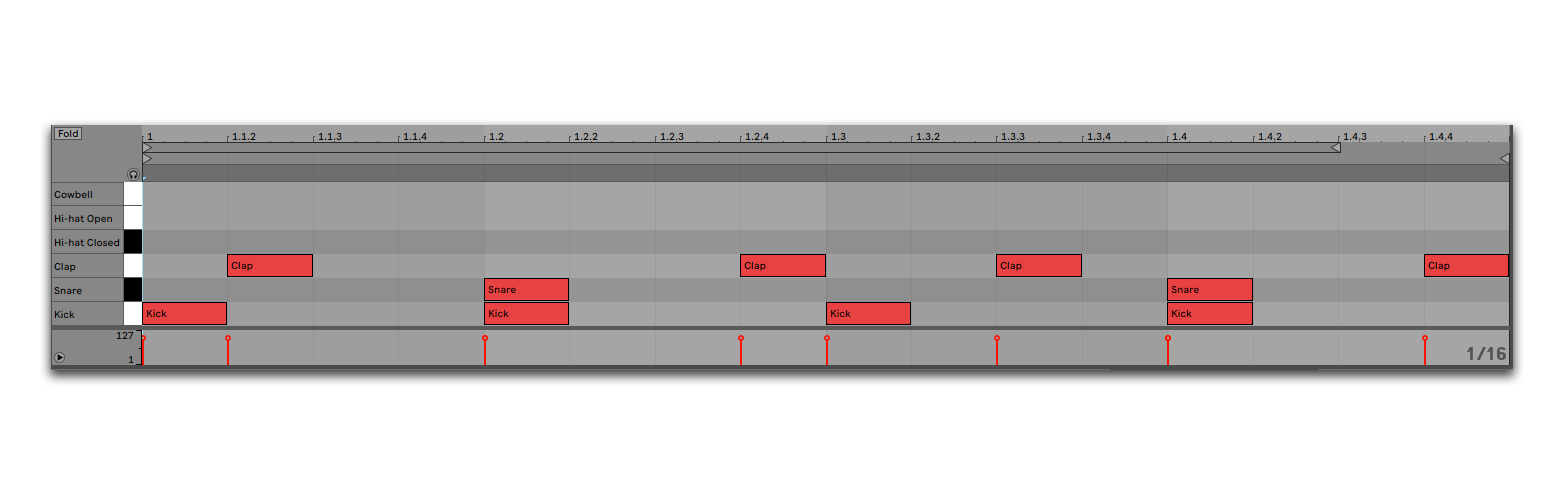
Make a random groove with your clap drum in between your other drum hits.
Hi-hat Closed

Use a 1/16 pattern for your closed hi-hat.
Hi-hat Open

Draw your open hi-hat in between your kick drum hits.
Cowbell (or random percussion sample)

Make a random groove with your cowbell or random percussion sample.
How To Make Your Beat Groovier
Even if your beat is insanely groovy on its own, you sometimes need to do a few tweaks to make it even groovier. And two simple ways to achieve a better groove is using velocity and offsetting notes.
Velocity

The velocity relates to how hard the notes will hit. More velocity in the case of drums, means a harder drum hit. Less velocity means a more gentle hit.
Change up the velocity for your different drum hits to make it groovier and more interesting. You can do it by highlighting the notes you want to change and changing the lines at the bottom of your piano roll.
Offset timing

Offset the timing on your notes a tiny bit for all your sounds, except your kick drum. Doing this makes your beat more ‘real’ and human, making it groovier and more pleasing to listen to.
How do you offset the timing of your notes? Simply pick a note and move it a few milliseconds to the left or right (a tiny, tiny amount.)
Are You Ready To Master Music Production?

You have now created your first-ever beat in Ableton. But what's next? It's time to layer that sweet beat with mindblowing melodies, chords, and pads.
You have to arrange it to a complete track, playing with the energy in the form of build-ups and drops. Then, you must mix the track to make it sound the part.
There's a lot of knowledge that goes into music creation. The process of learning everything you need to know often takes years of dedication and hard work.
But, there is a shortcut... a way you can get the key music production skills over 90% faster than others can.
With the right courses, you get all the knowledge you need to start making professional electronic music fast, without endlessly searching tutorials on Google.
Imagine living the producer life and having complete self-confidence in music production... knowing how to craft every sound you can imagine from scratch in your favorite VST synth, how to arrange it to professional standards and mix and master it to brilliance.
Well, good news.
The knowledge you need is bundled and ready for you in complete, expert-made step-by-step courses.
And not only that – they also include a massive library of all the professional sample packs and presets you need, including templates for all the finished tracks to discover all techniques and tips up-close.
We’re proud to present our biggest bundle ever for serious music producers…
Discover The Ultimate Bundle.
With over 193 products included and life-time access, you learn everything you need to know to make music your full-time career!
Included in our biggest bundle ever is:
- 34 Complete Courses + all products released this year
- 28 Sample and MIDI packs + all products released this year
- 108 Templates + all products released this year
- 30 Preset Packs + all products released this year
Production Music Live’s Ultimate Bundle shows you exactly how to:
- Make Earth-Shattering Deep Basses
- Write Breathtaking Melodies
- Craft Beautiful Harmony And Chord Progressions
- Get Inspired Instantly
- Create Sounds From Scratch In Your Favorite VST (Sound Design)
- Make Tracks From Start-To-Finish In Popular EDM Genres
Get ready to start your journey as a professional music producer with our biggest pack ever…
Premium Bundle: Ultimate

Click here to learn everything about music production.
Thanks for reading, and see you in the next article.
 Pelle Sundin is a Swedish music producer and writer, active with his chillout project PLMTRZ. He also produces psytrance. When he's not producing, he surfs, skates, and chugs coffee. |