Hi! In this tutorial we’re going to take a look at one of my tracks called „Cheerful“. We’re going to go through all the elements from which the track is made. Here’s the end result of it:
Get the free project file: DOWNLOAD HERE
(scroll down for video)
The full video tutorial including the project file will be at the end - so make sure to stick around!
The elements we’re going to go through are:
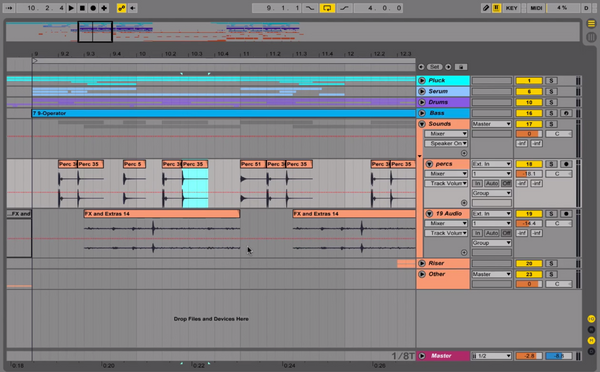
1. Pluck group - main melody
The track started out from a simple melody played with a sample in Simpler. I stacked it with Operator and on top of it played a melody with a harp instrument. Also - I recorded and reversed a part of the pluck melody to make it more interesting.
Here’s what this group sounds like:
2. Serum group - synths
On top of the main melody, I added three Serum tracks. First two of them have sawwave oscillators. Both of them have lowpass filters - which are being modulated by basic LFO shapes. There’s another track in Serum - it’s also a sawwave oscillator (with more voices this time) which fills some silent space and matches the melody.
3. Drums group
Along with the melody and synths, the track has a kick, snare, and hihats playing. As for the kick and snare - they’re both samples in Simpler. The open hihats are in audio form with a reverb on top to make the tail longer. There are also closed hihats playing - they are placed to match a part of the melody. There’s also a short snare at the end of each bar, placed a little bit off the grid (to make the drums sound more human).
4. Bass
I made the bass in Operator - it’s a sinewave modulated by another sinewave. It’s fattened by an overdrive effect, sidechained to the kick (when the kick hits, the bass goes quieter). Let’s give a listen to the bass with the drums - notice how the bass’s volume changes when the kick is playing.
5. Foley sounds & percs group
To make the track sound more interesting, I added an audio track with percs playing at not too obvious moments. Also, there’s a foley recording playing in the background - to add some organic feel.
6. Riser group
It includes a simple white noise recording (with automated volume - from quiet to louder) and a keys foley recording - both of these elements stacked in a group. The group has an Auto Pan effect on it, so that it’s acting like a Tremolo effect - essentially automating the volume of the group in a sine shape. Here’s what the riser sounds like:
7. Break
To make a break in the track, I added a Collision instrument with the initial preset. I didn’t change anything at all - I liked the sound of it. To sustain the rhythm, I added some snap sounds and percs. There’s also a really cool snare roll playing at the end - I’m just automating the volume and filter cutoff of that track.
Thanks for staying until the end! If you’d like to go through the elements in depth with me, here’s the video of me explaining them all. The project file is in the description of the video. Good luck with your music production!
Get the free project file - or watch tutorial on youtube:
One more thing - I’m doing private lessons through Skype. If you’d like to chat and make some music with me, here you can book a session!
 I’m k-pizza, a chill trap music maker who likes to share his experiences with other producers. I’m regularly going to show up with music and content at PML. k-pizza
Listen: https://souncloud.com/k-pizza