
The Serum synth from Xfer Records is a complete game-changer for advanced sound design. But how do you take advantage of all its controls and use Serum in the best possible way?
In this Serum beginner tutorial, you will learn:
- The different views of Serum
- What the settings, buttons, and knobs do
- How you can customize Serum
- Tips and tricks
Check out: Learn Sound Design With Serum
Have you installed your Serum VST already? Perfect. Let’s start this beginners tutorial with an explanation of the Serum main view…
Main View: Create Your Sound

Your sound creation starts here. When you open Serum, you see the Main view, where you control your oscillators, filters, LFO's, envelopes, and mods.
Let’s go through the parts of the main view in more detail…
Oscillators
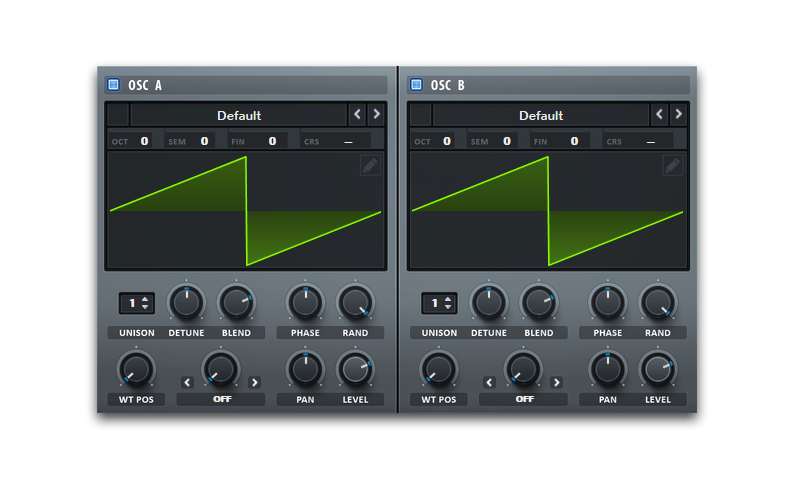
Creating a sound in a synthesizer starts with an oscillator. The same is true with the Serum synth. An oscillator is a looping waveform that gets different pitch and frequency characteristics depending on its waveform shape and ‘looping speed.’
In Serum, you can set two oscillators in OSC A and OSC B and combine them in many interesting ways, including FM, AM, RM, and Oscillator Sync. You can also change the phase, pitch, detune and play around with a wide variety of options to shape your perfect sound.
For example, the WT pos knob allows you to change your wavetable's starting point – and even automate it.
You also have Remap modes, a graph editor that allows you to draw your custom table manipulations. Load an audio file, and Serum will generate a waveform from that sound. You can also draw your changes directly in the editor.
The oscillator view also features a setting for Unison, meaning the effect of multiple voices playing simultaneously, preferably with slight pitch variations. You can find more settings to control the unison in the global view, but more on that later.
Unless you use detune, you will hear no real difference in the sound. Detune takes all your voices and pitches them apart from each other. But try it out – it’s a great way of thickening up sounds. But beware of phasing issues.
Sub

In addition to your two oscillators, OSC A and OSC B, you get a third oscillator called SUB. This setting allows you to layer your sound further. And you often use it, as the name suggests, as a layer below your sounds.
Start by choosing your oscillator and your style of sound.
You have six oscillators to choose from:
- Sine
- Rounded Rectangle
- Triangle
- Saw
- Square
- Pulse
All oscillators have individual characteristics. For example, sine is a very round and simple sound commonly used for sub-bass. Saw, square, and pulses give more frequency information and edge.
You can choose different octaves for lower or higher notes. With panning, you can control the sounds stereo speakers relation, left or right. Level controls the volume.
Noise

The noise oscillator is a very interesting Serum feature that allows next-level layering of your sounds – from hardware noise and beyond.
Load one of the presets, which range from hums to analog hardware noise. Now, you have a new dimension and layer in your sound, making it sound more organic and real.
There are many ways you can experiment with the noise oscillator. For example, you can use it as a fourth oscillator. If you load it with a wavetable that you saved and turn off the one-shot option, it will behave like a ‘normal’ oscillator.
You can also load interesting audio into it, like vocals, bird sounds, or anything else, and layer it over your original sound.
Filter

On the right side of your oscillators, you will find one of Serum's two filters, which is the one you will mainly use. The second filter is in the FX rack, but more on that later.
This visual filter features all the normal filter types you know and love, including low-pass, bandpass, and high-pass.
When do you use which filter?
- Low-pass removes frequencies above your cutoff.
- Bandpass removes frequencies above and below your cutoff.
- High-pass removes frequencies below your cutoff.
You also have 'peak,' which peaks at your cutoff frequency. The notch filter type does the opposite, creating a notch and removing the frequencies at your cutoff point.
Serum also features many other, more experimental filters, including comb, phaser, and flanger filter types. Check under the misc-tab for some very interesting filters, including one mimicking reverb.
LFO Section

LFO or Low-Frequency Oscillator is a frequency waveform that you use to control the parameters of your sound.
For example, this is a sine wave LFO in Serum:
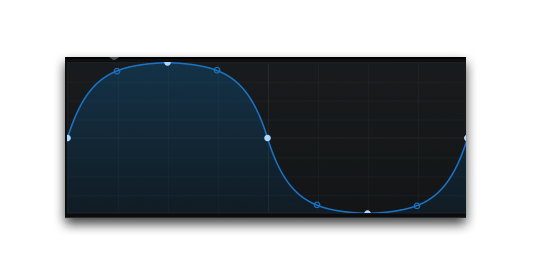
As you can see, the waveform goes up and down with peaks and troughs. When you apply that LFO to any setting, it will follow that pattern in your set speed and amount and apply it to your knob or setting.
You can use it on filters, pitch, effects, release times. In fact, you can use it on basically all settings and knobs in Serum.
Use the trig to restart the LFO cycle at each note hit, or choose ‘off’ to let it roam free.
Pro tip: instead of assigning your LFO’s in the Matrix tab, drag the LFO directly to your desired setting.
Envelopes

The envelope area in Serum gives you complete control of your sound with ADSR.
Simply put, this is where you control the amplitude of your sound. From how long it takes for your sound to play to how long the note will sustain.
But as you can see in the image, you have more than one envelope. What do you do with the rest of the envelopes?
Use the second and third envelopes similar to an LFO by routing them to your sound's different parameters and settings.
With three envelopes, you have unlimited possibilities in sound design.
Mod

On the left-hand side of Serum, you will find four mod knobs. You can route these to any setting with easy drag-and-drop.
They are a great way to keep your most important knobs in one place. If you use a MIDI keyboard, you can use them with your physical knobs to quickly access the most used settings.
And that's the most important feature seen in the main view of Serum. Let's see what you can find when clicking on the FX tab.
FX View: Design Your Sound

As you enter the Serum FX tab, you will find a great effect rack to take your sound design even further.
With ten effects to choose from, you get everything you need to take your sounds to the next level – from a powerful stereo imager to reverb and EQ.
Let’s go through the effects at your disposal…
Hyper/Dimension

The hyper and dimension feature two different effects in one.
With hyper, you give depth and edge to your sound, similar to a chorus effect. Set your rate, amount of detuning, and unison, and you instantly hear the difference.
Dimension is a stereo-expanding tool that shoots your sound to the edge of their speakers. Select the size and mix, and you're good to go. Max both settings for interesting results.
Learn more: Mixing Tips: How To Get A Wide Stereo Mix [3 Tips For Impressive Width]
Distortion

Distortion adds color to your sounds with accurate algorithms ranging from soft tube to heavy guitar-amp style distortions.
With the built-in filter, you can further shape your distortion the way you want it. For example, if you only want distortion on the low-end of your sound, you can set that with the filter.
Learn more: 5 Tips to Make Your Bass Sound Better
Flanger

The flanger is a type of delay which plays copies of your sound with a slight time offset, which creates a sweeping comb filter effect.
You can use the filter to create a spacey, metallic, and alien sound or use it to add some depth.
Phaser

Phaser is similar to the flanger but has a sweeping effect that comes from when frequencies from two signals phase and cancel each other.
Use the phaser for sound design or to make your sound fit better in your mix.
Chorus

Chorus copies your sound and plays it with slight delay and pitch variations for a fuller sound – like a choir.
You can use chorus to thicken up any sound or make it fit better in your mix.
Delay

Delay effect repeats your sound to emulate space.
Serum allows you to set different timings for the left and right delay and features a filter for you to shape it. Choose between normal, ping-pong, and tap delay.
You can use the delay to add depth or rhythm and groove.
Learn more: 6 Delay Mixing Tips For Interesting Echoes
Compressor

Compression is a way to amplify lower volume parts while taming the higher volume peaks of your sound.
Use it to control the amplitude or volume of your sound to achieve balance in your mix.
Reverb

Reverb is a diffused delay designed to add depth and emulate spaces.
In Serum, you get two types of reverb, plate, and hall, with controls to adjust the size, decay, low and high cut, spin, and spin depth.
Use the plate reverb to give your sounds a longer tail, depth, and a metallic shine. And use the hall reverb for a real-world acoustic simulation of a grand hall.
Learn more: 5 Reverb Mixing Tips For Deep Music
EQ

An equalizer controls the frequencies of a sound.
The two-band EQ in Serum is very easy to use. Select your curve, adjust your frequency, Q and gain. Bam, your sound is ready to go.
Learn more: How To EQ: 3 Critical Things To Avoid Doing
Filter

This filter does the same thing as the filter in Serum’s main view. The only thing missing is the visual interface.
Other than that, you can use the same filter types, choose your cutoff, resonance, drive, fat, and panning.
Tip: Combining different filters can yield interesting results.
Matrix View: Control Your Sound

The Serum Matrix view is where you modulate your sound inside Serum. If you have modulated a knob with the drag-and-drop, like your filter cutoff with LFO1, it will appear in the matrix view.
You can also modulate sounds from scratch by choosing your source, destination, and amount of change.
In this example, we have modulated the coarse pitch of OSC1 (our first oscillator) with LFO1:

The matrix view allows your Serum crafted sounds to come alive. I highly recommend playing around with it and different sources and destinations.
Experiment with both subtle and extreme modulation and find a suitable style for the music you want to create.
Global-View: Chaos And Settings

The last and final stop in Serum is the Global settings, which feature some very interesting things, including two LFO’s called CHAOS 1 and CHAOS 2.
Let’s go through what you can do here…
Chaos Controls

To the top left of the Global view, you see two low-frequency oscillators called CHAOS 1 and CHAOS 2.
Chaos LFO behaviors:
- Chaos 1 is more repeating, with two different tendencies to go up or down.
- Chaos 2 nature is more ‘restarting’ and chaotic.
When you want weird modulations or want your sound to go completely bonkers, go to the matrix view and assign one (or both) LFO’s to your desired destination.
The result? Unpredictable chaos. Madness. Beauty.
Control the chaos a little with the BPM Sync button to make it play in tempo with your track.
Use the Chaos Mono switch to make all voices in your sound modulate to one LFO, rather than one for every voice.
Unison

In the global view, you find more settings to control the unison you find under your two main-view oscillators.
Range allows you to set the number of semitones that the oscillator’s unison detune knob will cover.
Width controls the amount of stereo spread between each unison voice. The higher the number, the more stereo spread.
Warp sets the warp offset for your unison voices and needs unison and warp mode (for example, FM or sync) activated for your oscillator.
WT Pos is similar to the Warp function but offsets per unison-voice with the WT Pos.
Preferences

Make Serum yours by customizing the preference settings to your liking. Here, you can turn on or off help tooltips, hide the piano keys or set the action of a control double-click.
Oscillator Settings

In the upper right corner, you will find a few more oscillator settings. Set the oscillators' quality when using a Warp mode and choose whether your oscillators should be in tune with the MIDI note you play.
Summary

Congratulations, you have now learned the Serum synth. Now it’s time to make this knowledge practical and start creating your dream sounds.
Knowing the fundamentals of a synthesizer is key. Not only does it help you create sounds from scratch, but it also allows you to change presets to better suit your music track.
But sometimes, seeing all the knobs and different settings of a new synth can be overwhelming. While you may know the basics, it’s nice to get a thorough explanation of what each section can do.
We hope this Serum beginner’s tutorial has been of great help to you.
Next-Level Your Serum Sound Creation
Understanding a new synth with little foundational knowledge takes dedication and many long hours in the studio.
After reading this article, you know a little bit more about Serum. But you still need more knowledge to begin creating sounds with ease and precision.
You can try and learn Serum all by yourself...
But why spend hundreds of 'trial-and-error' hours when you can learn how to craft your dream sounds — from scratch — in Serum, in only 5 hours?
Take control.
Today, you can learn how to create jaw-dropping leads, pads and basses from Serum, with zero previous knowledge. Learn the critical elements of sound synthesis design that you can apply to almost all synths.
In a glimpse, you will learn how to:
- Create dreamy Serum sounds from scratch
- Apply sound synthesis on your sounds
- Save time with new techniques and tricks
Good news...
You're only one click and five hours away from learning how...
Course: Xfer SERUM + Sound Design
Click here to become a Serum master today.
Thanks for reading, and see you in the next article.
 Pelle Sundin is a Swedish music producer and writer, active with his chillout project PLMTRZ. He also produces psytrance. When he's not producing, he surfs, skates, and chugs coffee. |