
Creating depth and space are two essential parts of mixing music.
And like the other parts of your track, reverb mixing is also essential to for deep music, to make your space shine in the best way possible.
Like any other sound, you can treat reverbs according to the needs of your mix.
Too much low-end? Cut it out.
Want your reverb to duck your sound? Sidechain compression.
Want to learn how to mix and master your music today? Click here.
There are no limits to what you can do with your reverbs. This article will share five tips for reverb mixing that take your mixes to the next level.
Let us share one thing before we start…
Starting Tip: Use Reverb Sends
The best way to mix reverbs requires you to get control over your reverb.
Starting, we need to explain how you can apply and mix reverbs in the best possible way.
While it might be tempting to put a reverb in your MIDI or audio channel directly, it’s not something you want to do every time.
Why?
When you apply reverbs and effects directly in your channel, your whole audio signal gets affected.
For example, you might lose punch and clarity on drums if a reverb processes the whole audio signal.
A better way is using a reverb send to get two signals — one completely dry and one wet that you can process independently.
For our drums example, it means we keep our dry drums intact and punchy while having a separate reverb channel to play with.
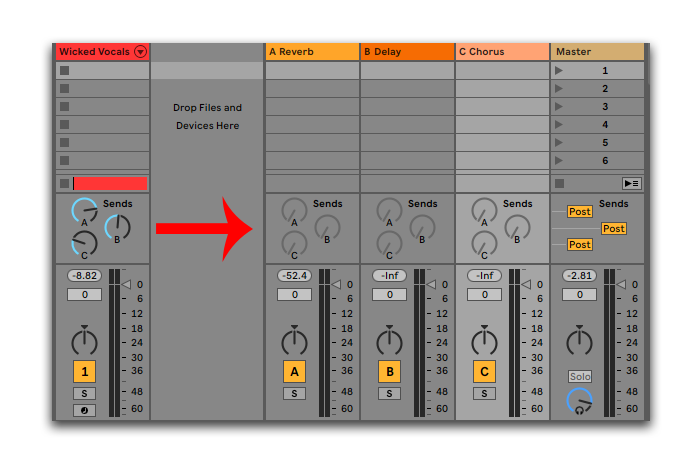
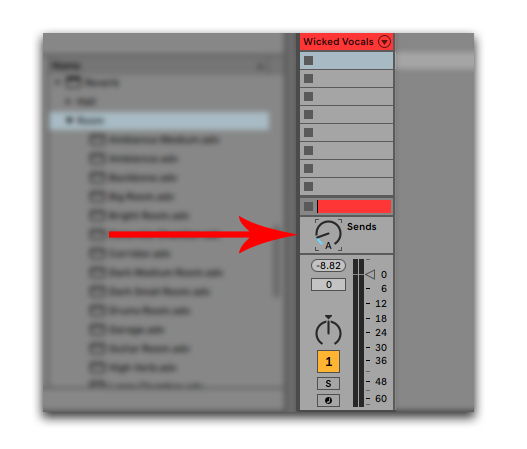
How To Create A Reverb Send
In Ableton Live, 'reverb sends' means sending your original sound to one of the A/B/C channels, where you apply reverb on 100% wet.
Using reverb sends accomplishes two things:
- You get a dry and a wet signal
- You can apply effects on your reverb signal
If you want to add more 'sends', click "Create" and "Insert Return Track."
How To Make A Reverb Chain
You can also achieve the same thing inside the channel of your original sound.
Right-click on the reverb effect in your channel and select ‘Group.’
Right-click and select ‘Create Chain.’
Now you have two copies of the same channel, one with your reverb on full wet, one without your reverb.
Change the volume of your wet channel to set your amount of reverb.
Now when we know how to apply reverb in the best way possible, let’s continue with our reverb mixing tips.
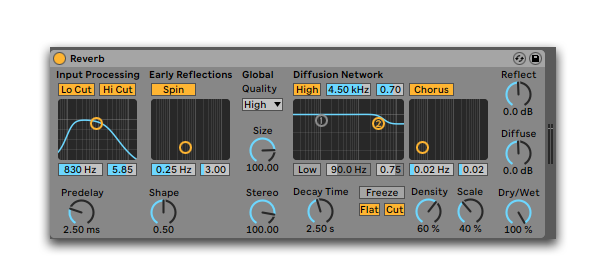
1. Shape Your Reverbs With EQ
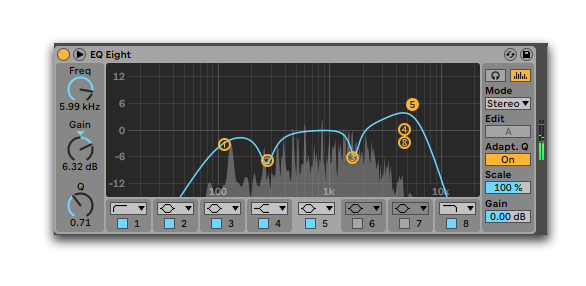
A large part of mixing is using equalization, or EQ, to cut problem frequencies and amplify good ones.
The same is also true for effects like reverb.
Because sometimes, frequencies can get a little out of hand (or too little out of hand.)
Reverbs also need equalization, just like any other sound.
Even if your source sound is perfectly equalized, your reverbed signal will be different.
And as an entity that needs to fit in your mix, you should treat your reverbs as you would any other sound in the mixing process.
Use an equalizer.
And remember to remove low-end from your reverbs as bassy echoes doesn't go hand in hand.
2. Remove Muddiness
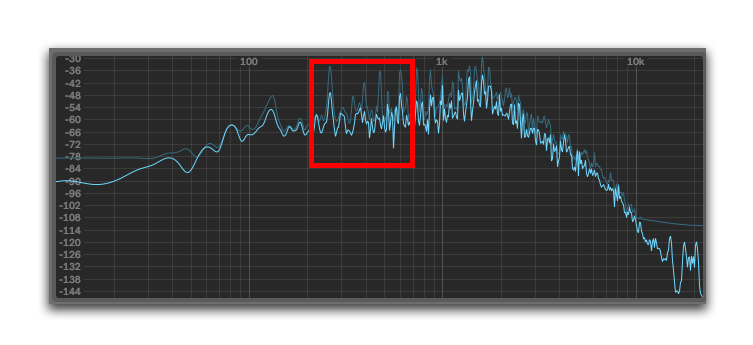
What is a ‘muddy’ mix? Well, it’s not taking your mixer and throwing it in the dirt after it rained, let me tell you that.
Muddiness in mixing refers to the overbuilding of frequencies that sound ‘muddy.’
It typically means that your mix is starting to lose clarity and that it can be difficult to hear the different sounds.
Which frequencies, you ask?
Muddy frequencies typically reside in the mid-range, around 200-500Hz.
When you have many sounds with reverb that all cloud up those problematic frequencies, it can turn a mix into a bad one.
Cleaning out the mud of your reverbs follows our first tip on using EQ.
Because to reduce reverb muddiness, you need to use EQ to remove the problematic 200-500Hz frequencies.
However, it doesn’t mean you have to remove the frequencies altogether. And it doesn't mean you do it for each of your reverbs.
What it means is – listen carefully to your reverbs. Watch spectrum analyzers.
Are they peaking or dominating in the muddy areas? Reduce it.
Remember, a little goes a long way — especially when combining your efforts over multiple sounds.
3. Sidechain Your Reverb
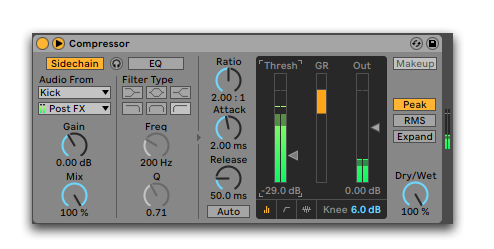
A vital part of mixing is about making space for your sounds to breathe.
And there are times when you don’t want your reverbs to take over the rest of your sounds.
Thankfully, there’s a way to fix that.
And you’re probably familiar with the term – sidechaining.
Sidechaining is a technique commonly used to make your bass duck in volume to make room for your kick.
It works by applying a sidechain compressor on your chosen channel, routing it to the sound you want it to duck, and adjusting to taste.
The best way to sidechain your reverbs is to apply it to your reverb send.
On your wet reverb channel, add the sidechain compression and route it to the sound you want.
For example, you can make a vocal reverb duck your singer by routing the sidechain compression to your vocal track.
This sidechaining technique is effective to ensure your reverbs don't drown out your other sounds.
You can also use it for the cool effect.
In a reverb-heavy track, route the sidechain compression to your kick and make it bouncy.
Sidechaining is your friend.
4. Tempo Match Your Reverb
Believe it or not, tempo matching your reverbs can make a tremendous difference in your mix.
But what do we mean by tempo matching a reverb?
Well, a reverb has two interesting settings:
Pre-delay and decay.
The pre-delay is the time it takes for your sound to start its echo.
Decay is the time your reverb will echo.
Putting the two together gives you a total reverb time.
If you make your reverbs fit with your track's tempo, your reverbs become an element that adds to your track's overall groove.
But how can you know what pre-delay and decay times you need?
Simple. Use a calculator, like this one.
Enter your BPM and see the pre-delay and decay times for different room sizes.
5. Use The Right Amount
Unless you’re a mixing master with a very specific sound design purpose, drowning everything in reverb is often not the answer.
Firstly, reverb can be difficult to control.
The sound characteristics are diffuse, and mud can quickly build up if you’re not careful.
Plus, why would you want to make your beautiful sounds diffused?
When used correctly, reverbs are a great way to add depth to your mix.
But it’s easy to overuse them.
In mixing, a little goes a long way. Use reverbs with care.
A tip for most of your sounds is applying just enough reverb to hear it.
If you want one or two sounds to have a grander soundstage, you can. But try to think in terms of contrast.
Don’t drench all your sounds in massive reverbs.
Make one sound stand out from the rest.
Learn The Complete Process To Professional Mixing And Mastering

Mixing and mastering is a true skill that takes years of intense focus, training, and hard work.
Knowing what decisions to take to bring out the best in each sound while making all sounds work together is tricky.
You want to give your music that sweet signature sound and style to stand out.
But what if you could learn the exact process of what to do in different situations to achieve your desired mixing and mastering results?
Mixing and Mastering Bundle, containing five complete courses with life-time access, shows you precisely what to do.
In the complete, online courses, which includes:
- Mixing And Mastering A Melodic Techno Track (masterclass)
- How To Mix A Track With The Best Plugins Available
- Mixing A Track From Start To Finish (using stock plugins)
- Mastering From Start To Finish
Plus a complete masterclass for mixing and mastering future bass…
You will learn the complete process to mix and master your tracks, making your sounds powerful and loud, like the radio tracks.
You will also learn how to give your tracks their signature sound while keeping balance and finesse to make them sound as good as they can.
Learn The Complete Mixing And Mastering Process
And with a complete walkthrough of the most-used mixing and mastering tools and effects, like compressors, equalizers, multiband, and limiters, you will have invaluable knowledge, serving you well for the rest of your music career.
Mixing And Mastering Bundle

Thanks for reading, and see you in the next article.
 Pelle Sundin is a Swedish music producer and writer, active with his chillout project PLMTRZ. He also produces psytrance. When he's not producing, he surfs, skates, and chugs coffee. |