This article is an extract from our new guide, in which I’m showing how to apply the knowledge from this article to making a future bass drop. Here's a video tutorial with me making it:
Hi! Today we’re going to make an awesome Future Bass synth from this drop:
Excited? Let’s jump right into it.
Let’s start by making a new MIDI track first and dragging a Serum device onto it.

 Now go into the free download folder and find a MIDI file called CHORDS.mid
Now place it on the new MIDI track.
Here's what we've got so far. Bear in mind that it's the initial patch of Serum, it's pretty aggressive sounding.
Let’s now make this synth awesome. First of all, open up Serum.

Now look at the first oscillator - it’s the only one playing. The zig-zag looking „Default“ waveform which is playing there is called a „saw wave“.
We’re going to add more of these saw waves. To do that, we COULD turn on the second oscillator (OSC2). However, doing that we’re limited to having two waveforms. Luckily there’s an option to „clone“ a waveform without having to use another oscillator. That’s called UNISON.
New terminology you need to wrap your head around: (very simply put)
Oscillator - the part of a synth which generates sound.
Waveform - the type of sound coming from an oscillator.
UNISON - allows you to duplicate the waveform inside a single oscillator = increase the oscillator’s „voices“
Okay, so let’s crank the Unison of the first oscillator to 5 and hear what happens.
 .
. 
You’ll see 4 more „lines“ appear - these are the 4 additional voices. The synth will sound bigger and wider. What you need to do now is to turn down the „Detune“ knob of the voices to around 10 o’clock. We want the voices to be closer together, more in tune.
Okay, now let’s finally make the synth less aggressive. In order to do that you’ll need to turn on the „Filter“ section of the synth.

The synth will immediately sound much quieter and more subtle. That’s because we’re cutting off the high frequencies of the sound. To understand what a filter does to a sound, it’s best to let the synth play and to play around with the „cutoff“ knob - which controls how much of the high frequencies the filter is cutting off.
***
Tip: Such filter has a name - it’s called „lowpass“ - because the low frequencies are passing through and we’re cutting off the high frequencies of the sound. It’s probably the most commonly used type of filter (accordingly, there’s also a „highpass“ type of filter which is the exact opposite)
***
Now take a listen to these two clips:
The whole difference between them is is that in the second clip the cutoff knob is moving in time. That adds movement to the sound.
One way of making this could be to record the clip while moving the knob with your mouse - that would save the movement. However a much easier way to do this is to use Envelopes and LFOs to move the knob for you every time you play a note - that’s what we’re going to do.
Let’s then turn the filter’s „cutoff“ knob all the way down for now. That’s going to be our starting position, from which an envelope is going to move our knob up.
Now select ENV 2 and set its „Attack“ knob to around 685 milliseconds. That’s the time it’s going to take the envelope to bring the „cutoff“ knob all the way up.

Now drag the „four arrows“ sign next to „ENV 2“ onto the „Cutoff“ knob - just drag and drop it there.


Now when you’ll play the clip, you’ll notice that the „cutoff“ knob will move in time.
This is what it should sound like:
Let’s take a closer look at the cutoff knob now.

The moving tiny blue dot (1) matches the „current position“ of the knob. The blue line around the knob (2) indicates how far do we want the knob to move. For example now our knob moves from 0% to 100%.
The tiny „round blue line icon“ (3) is what we can use to change how far we want the knob to move. Click on it and drag it down to 30%. Now the synth should sound like this:
That’s all we’re going to do with this envelope. Now we’re going to add an LFO.
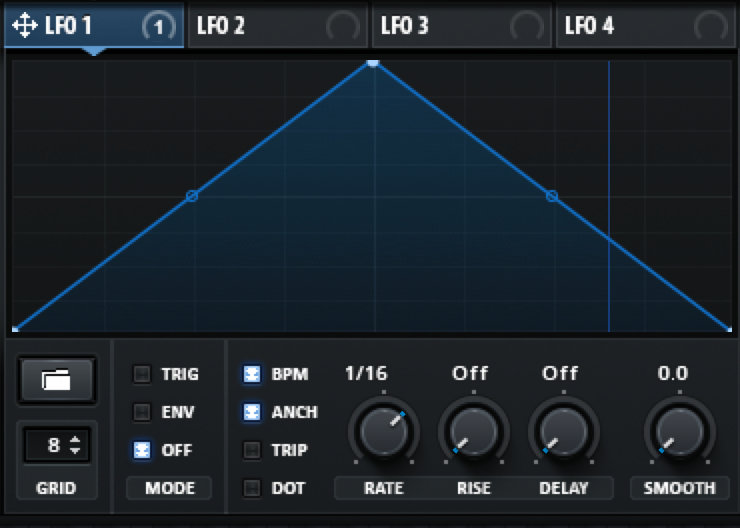
An LFO also manipulates a knob for you, but instead of a single movement per note it performs a movement in a loop - as long as you’re holding the note. The movement type by default is set to go up and down like this: /\/\/\/\ …
Click the „LFO 1“ panel and drag it onto the „cutoff“ knob.

If you play the clip you should hear the cutoff knob go up and down like this:
Now that we have the right speed of the LFO, change its amount to around half.


Now on the effects list find Reverb and click the box on the left so that it lights up.
A Reverb effect will show up and when you play the synth, you’ll hear it.
Now just turn down the „MIX“ knob on the right to about 1/10 (so that the reverb is barely audible)

That’s all for the synth! Thanks for reading and good luck with your music making.
This article was an extract from our new guide „Beginner’s Guide to Ableton & Serum - Making a Beat from Start to Finish”, in which I’m showing how to apply the knowledge from this article to making a future bass drop.
Video Tutorial of me making that track:

k-pizza
I’m k-pizza, a chill trap music maker who likes to share his experiences with other producers. I’m regularly going to show up with music and content at PML.
Listen: https://souncloud.com/k-pizza